Hi there 🙂 I colored up this sweet image from Elisabeth Bell with my Copic markers to have a card on hand to just send to someone to say “hi”. This little sweetie with her cute bee friend was a freebie a while ago, and I finally had a chance to play!!
I used the same Nellie Snellen oval die to cut the image and the window in the black CS out. I used a Whimsy (I think) beehive die to place behind the window. After cutting a curved edge on the black, I backed it with a cute bee print paper, then cut a stitched strip to separate the 2 pieces. I printed the sentiment on the computer, then used a banner die to cut that out. I added a few bee stickers that I had in my stash, and made some “flight paths” with some white gel pen to finish this card off 🙂
I’d like to enter this in the following challenges:
Allsorts Challenge – Week 456, I Spy Something Beginning With B (bee, black, beehive)
Good morning 🙂 I have a CAS card here for you, featuring an image from Limited Runs Stamps. Fluffball can be found here. I printed a whole row of him, turning the “unique” one upside down 🙂 I also added a fitting sentiment to the line-up while printing. I colored them up with my Prismacolor pencils, having a bit of fun with the “imperfect” one 🙂 I doodled a quick outline around them, then added a spattering of Nuvo drops to the card. Love how quickly a CAS card goes together!! Now, to decide which of my wonderfully, perfectly unique friends this is for <3
Hello again 🙂 I’ve been busy coloring and making cards this last week, and now I’m blogging like mad :/ I finally got around to coloring one of the beauties from Make It Crafty, something that has been on my need to do list for way too long!! This lovely lady is Matilda Celebrates. I colored her with my Copic and SN markers, adding dots to her dress with the mid-tone color, and some beaded curtains in the background with a black fine liner.
When I set to making up the card, I wanted to keep the image in focus, and keep the whole look festive, yet elegant. Good thing I have thousands of sheets of DP to choose from, lol! I found the funky black and white circular patterned paper….the black parts are a fuzzy velvety texture. I die cut the word “celebrate” out of a holographic piece of plastic with a die that I got quite some time ago, and have forgotten where from!! The plastic was quite heavy and really put my poor Cuttlebug to work!! After getting everything glued down, it still needed a “bit” more, so I added some iridescent and pink sequins for the final touch.
I’d like to enter this in the following challenges:
Hello 🙂 The card I have here is proof that sometimes I act on ideas before my brain kicks in. I got this brilliant idea, when I saw that the current Power Poppy challenge was Love to Sparkle. My idea was to print an image on glitter paper!! I chose the lovely Asters Abuzz, from the Power Poppy digital section, and printed it on a heavy cream colored glitter stock. It printed pretty good, once I cajoled my printer into taking the paper!! The not so bright part came when I took out my (not cheap) Copics, and began to color!!! The first couple of strokes of the marker told me that I was in dangerous territory, where the health and welfare of my markers were concerned!! But, being incredibly cheap, and not wanting to waste even the smallest scrap of paper, I just had to continue…..instead of strokes, I basically dotted the colors on, very very very carefully!! When I was done with the markers, I added a few highlights with my white gel pen….using strokes, and promptly clogging my pen 🙁
I cut the image out with a die, then had to decide on a layout that didn’t completely overshadow this one and only project. I played around with a number of colors and prints of papers, when I grabbed the black glitter….in the back of my mind, I was thinking “too much!!” – but it wasn’t!! It looks really cool 🙂 I used a corner die so the green backing paper would show through, and added a few Nuvo drops to the corner to coordinate with the strip of white ribbon that I wrapped around the center. This finished the card, leaving it uncluttered, and letting the image and the sparkle shine through. I wish I could have got a better picture, but this was one of “those” cards that you take about a million pics, and none do justice to how it really looks!!
Hi there!! Time to blog my week’s makes….a bit later than usual, but I’ve had such a lazy weekend…..it’s wonderful!! This sweet card features an adorable image from Tiddly Inks, called Willow the Greeting Fairy. The sentiment I’ve used, as well as a few others, come with her, as well!! I decided to keep spreading the love with the sentiment, as Valentine’s Day isn’t THAT far past….and love and kisses and hugs are good anytime!! I colored her up with my Copics and added some Wink of Stella to her wings to give them a bit of fairy sparkle 🙂
You can see the sparkle a bit better in the close up. I cut the image and sentiment out with a die from one set, then used a similar, stitched die from another set to cut a piece to layer underneath her. I just got the heart cluster die (after V day), and had to use it with her, so cut it out 3 times, twice from glitter stock and once from plain CS. I used the pink sparkle outline, then inlaid it with the cuts from the other colors. I also used some of the hearts for a corner accent. A white ribbon around the middle of the striped background completed this card 🙂
I’d like to enter the following challenges with this card:
Good morning, the card I have today is my DT piece for the new challenge at the Creative Fingers blog, and features a Power Poppy image. All of our challenges are ATG, so we’d love to see whatever your creativity has produced!! Angelique is sponsoring us again with a fabulous prize of a gorgeous stamp set 🙂 Stop by to check out the fab prize and all the amazing work done by my DT teamies 🙂
This card “kills 2 birds with one stone” as the saying goes, because it’s also for the current Power and Spark Challenge at Power Poppy. I know that a lot of people thing “flowers” when Power Poppy is mentioned, and while Marcella’s flowers are absolutely breathtakingly beautiful, she’s a woman with many talents, as this image (and others in her shop), show. This Leaping Trout set caught my eye, as there are so many fishing enthusiasts in my area (fanatics may be a better word, lol). I wanted to go a bit out of the box for the challenge, which theme is “Love to Sparkle”, so out came the fish 🙂 I don’t generally thing of sparkly things when I make a masculine card. After coloring the fish with my Copic and SN markers, I added a subtle chalk background, then got out the glitter for the water 🙂 I layered the image on 2 stiched rectangle cuts….one from a basket weave texture paper, and one from a glitter sheet that matched some of the water sparkle PERFECTLY!! A simple striped DP was a fitting background. I recently got a fishing set of dies from Gina K, and cut the rod/reel out, then added a sparkly hook cut as well. I deliberated what kind of sentiment to use, until one of my fishing friends posted a pic on Facebook of a fishing trip they took last year, with the caption “LOVE this!!!” Done!!! And a perfect sentiment for the challenge theme too!!
I’d like to enter this in the following challenges:
Hi there!! It’s hard to believe that it’s already the 20th of February already!! Time is going so fast….wish it would go faster and the weather would warm up, though!! Today marks the start of a brand new ATG challenge at the Sheepski Designs Facebook Group. Although we are ATG, there’s always an optional twist, to help get the old mojo flowing, and this month it’s “Celebration”. Andrea has a ton of gorgeous images in her Etsy Shop, so you have lots to choose from!! I have this discount code to help you out with your shopping:
skisusan10
For my inspiration card, I used a brand new image, available in the store now, Flower Bouquet 🙂
I was up to my old tricks of printing it waaaay tiny….but I decided to give coloring it in a shot anyway, grabbed my Copics and am really happy with how it turned out 🙂 I found a pad of DP that had a number of chevron prints, so went with that. I cut apertures in both the aqua and pink pieces, and layered it up, with the beautiful flowers peeking through. I cut a few banners, one from the aqua, and one from a piece of white CS that I had embossed. I’m loving the look of a sentiment is a bit mixed up….the “good” is die cut with a Tim Holtz Sizzix die, and the “bye” is stickers….what a great way to use up some of those odd letters that seem to be left over on every sticker sheet!! I added an adhesive triangle from Freckled Fawn and some Nuvo drops to the corner to finish this 🙂
I would like to enter this in the following challenges:
As You Like It Challenge – Favorite Way to Add A Sentiment – mixing it up! Why? Love the look of the different fonts, and it’s a great way to use up some odds and ends in the craft stash!!
Good morning and happy Monday!! Today is an extremely exciting day for me, because I finally get to tell everyone that I’m now a very proud member of the Aurora Wings DT, and I get to show you my first project as part of the Aurora Team 🙂
This month, Mitzi came up with a super fun theme to play with, and it’s a Bingo Board!!
Click on the board to take you right to the challenge 🙂
You can use the colors, the elements, or a combination of them both, as long as you make a straight line horizontally, vertically or diagonally!! With choices like that, it will be easy to create something for this month’s challenge 🙂 For my card, I used the adorable Primrose Elf, available exclusively at the aurorawings.com store. You can find her in JPG here or PNG here.
So before you try to figure out what line I chose, I better tell you…I decided to go all out and do a double black out (also known as full house), and use all the colors and all the elements! I’ll be honest and say, I was wondering about my sanity a few times during the making this project because of that decision!!! I colored the image with my Copic and SN markers, managing to get at least a bit of each color in while doing so (there’s a tiny bit of green in her eyes and a few of the leaves…to save you some zooming, lol)
I mounted this little sweetie on a piece of black CS that I wrapped with a sheer white ribbon, then die cut a window to layer on top, for her to peek through in a piece of white CS. I fired up the old sewing machine and stitched around the aperture and the outer edges of the white piece with some black thread, and popped it up on some foam dots over the black CS and image. I also cut a teal/aquadoily so it fit around the bottom of the opening. For theflowers, I die cut them, then colored them red and pink to match the primroses in the image, adding glitter to all the centers. I die cut a few different types of leaves from some assorted green scraps I had, and arranged these, along with the primroses and some small punched blue and purple blooms, around the image. I tied a fluffy bow to balance the top part of the card out a bit, and added a few of the blossoms to it as well. For the beads/button option, I picked through my seed beads to find yellow ones(which, for some reason, were all mixed up, not arranged by color!), and arranged them in sprays from the flower arrangement. I finished the card off with a sentiment that I stamped with an old CTMH stamp. When I looked at the finished project, I realized that I had managed to implement all the colors in the rest of the card as well!!! Woohoo!!
I do hope that you can join us at Aurora Wings Challenge Blog to play Bingo with us!! Our challenges are a month long, and have fabulous prizes (Mitzi’s images!! What could be a better prize???). While you’re there, check out the rest of the DT inspiration…..it is absolutely JAW-DROPPING GORGEOUS!!!
I’d like to enter the following challenges with this card:
My last Valentine’s card for this year….good thing it was to be delivered after the 14th, too….or it wouldn’t have been done!! I printed the image, Cute Heart Valentine’s, from Star Stampz, very, very small (<2″), then, rather than wasting ALL THAT paper, I proceeded to color, with my breath held the whole time!! It got particularly dicey when I had to abandon the brush tips of my Copics, and turn to my bullet nip SNs!!
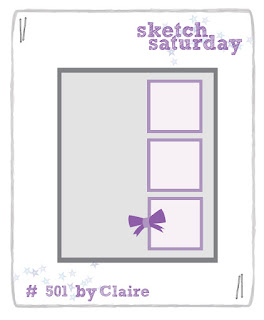
I messed around with the layout and the papers for what seemed like forever, until I settled on the heart print paper, that came as a freebie in a magazine years ago, and saw this sketch, at Sketch Saturday:
I used other elements from the same freebie paper pad to make up the other parts of the sketch. I punched 2 hearts from a red print, and edged it with white stitching detail, and made a label “thingy” to back the letters. I edged the label with the gel pen stitch detail, and attached it to the card with a couple silver brads. I’m so happy with how this turned out, especially as I was in a bit of a panic less than 2 hours before I had to deliver the card!!
I’m blogging up a storm this morning…I think the coffee has cut in!!! Here’s another Valentine’s card, made with another image that got buried in my files, as I kept intending to use it. I’ve had this sweet Valentine girl for ages and ages, and, while I know it’s a Whoopsi Daisy design, I can’t tell you anything more about it!! I colored this little one up with my SN and Copic markers, adding a few dots on the chocolate box (or card?) with white gel pen. I found a scrap of the right pink to mat her with, and cut the edges with edging scissors (I’m digging deep in my supplies, LOL), then dotted the edges to coordinate with the image. As I was rummaging through stuff, I also found the striped DP scrap that I used as a background. The heart shaped doily and the chipboard hearts were also “I forgot I had this” items. I doctored the chipboard hearts up, one by embossing with white and adding some pink dots to, and the other by coating in red glitter. I arranged everything with a strip of sheer ribbon and a bow, and used a piece of red glitter paper for matting. With all the forgotten supplies and the old fashioned image, this card is a blast from the past 🙂